Our bride and groom
wanted to have a somewhat traditional small top tier wedding cake to freeze for
their first anniversary. I struggled
with the decoration - it couldn't be all fluffy and roses and pearls … all traditional
wedding cake-y. It just wouldn't have
fit with the feel of the cupcakes.
I knew I needed to
have sunflowers as the floral part of the cake, but at the time I was starting
to plan the cake decoration I still wasn't happy with the sunflower decorations
on the cupcakes. It's great to live close
enough to go to Country Kitchen (or maybe it's not!) because just browsing all
the wonderful cake and candy supplies helps me come up with ideas.
One of the reasons I
wasn't happy with the cupcake sunflowers was that the centers just didn't look
right. I didn't want to use Oreos because they were really too big and they just
aren't, well … pretty. Wandering down
one aisle at CK, I found different sizes of sunflower/daisy fondant cutters and
daisy center stamps. I thought I had the
answer to my problem and also I thought
the multiple sizes of the
sunflower cutters would be
helpful in decorating the cake. Since I
already had the black fondant for the lizards, all I needed was plain fondant
that I could color for the sunflowers.
 |
| Work in Progress |
Once I got home with
my new acquisitions, I started hunting around the internet for instructions for
making gumpaste sunflowers. You Tube has
several really good videos. After a bit
of trial and error I learned that using the proper equipment really does make a
difference. I tried rolling the fondant
with my trusty marble rolling pin and I just couldn't get it thin enough. When I finally broke down and got a fondant
rolling pin and mat, it was a breeze. I
also had to get the veining tools. It
makes a huge difference!
 |
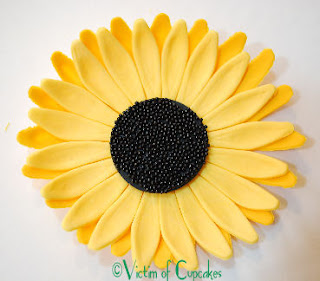
| Large Fondant Sunflower |
 |
| Small Gumpaste Sunflower |
I made a bunch of
each size sunflower. I used two large
sunflowers "glued" together to make the large flowers for the top of
the cake and put one of each size of the smaller sunflowers together for the
smaller flowers. The daisy center stamps
worked fine for these.
And then … I
realized the sunflowers needed leaves.
By that time, I had no more time to run to Ft. Wayne to get any kind of leaf cutter or embosser and
poking around in my box of cookie cutters didn't produce a leaf cutter. So I just cut them out and used the veining
tools. Somehow, they came out looking
ok. Not great, but ok.
The cake was the
last thing I decorated and I finished it at 4:00 the morning of the
wedding. I was having so much fun that I
really never got tired. My hands were
getting sore and you can see the piped decorations on the cake - the bows and
swags aren't very good. Fortunately, the
cake was so high on the stand that no one could really inspect it! LOL
We loaded all the
cupcakes into the cardboard boxes with the inserts that night as I completed
them. I left the cake until
"morning" (2 1/2 hours later!) to make sure the icing had hardened a
bit.
 |
| Cleaned Hatbox |
Moving the cake was
horrifying but I got it on the bottom of my trusty Tupperware cake taker but
when I tried to put the top on I discovered the big sunflowers on top caused
the cake to be too tall. Ho-ly c r a p. My husband thought of a hatbox. I'm a mild mannered owner of an online
vintage clothing shop, so hatboxes I have but I needed a big one. I thought of one particular box because it is
plastic and came apart AND it was already damaged so I only use it for
storage. After washing it up thoroughly,
it served its new purpose perfectly.
 |
| Cake in Hatbox |
As I was cleaning up
my mess a few hours earlier, I put together a little "kit" with white
and pink frostings, pastry bag, the decorating tips I had used, and a few extra
little sunflowers and leaves. This was
fortunate because I had to re-do the shells on the base of the cake because
they all broke off while moving it. One
pink bow got a bit squished so I re-did that, too.
Honestly, I still
can't believe how smoothly it all went.
Guess that 6 months of practicing and planning really paid off!

IT LOOKS SO GOOD! wow, and you had to be so creative. seriously, thumbs up. it looks GREAT.
ReplyDeletexo
Angie
sundaybelle.com
Thank you! :)
ReplyDelete