Pages

Sunday, January 1, 2017

Clean Eating for the New Year


A brand-spankin’-bright-n-shiny New Year has begun.  Despite having just survived a 2016 that sometimes seemed to be more a series of battles than a normal, peaceful life, I’m looking forward to having a 2017 that is a bit more sane!

Over the past two years, the Hubster and I have had a couple of fairly serious health problems crop up that have culminated in tons of research into – What The Heck Happened To Us??!! 

First, I started having severe attacks of diverticulitis.  Then my husband contracted severe and sudden onset of Rheumatoid Arthritis.  The end of 2016 now finds me missing 14” of my colon and my husband is in the process of recovering from a full knee replacement.

When your entire world turns upside down, naturally you ask a lot of questions.  I needed to know how to deal with our ailments, what caused our health problems, how to prevent more, and on and on.  I learned that Rheumatoid Arthritis is an autoimmune problem and no one seems to know what the actual cause is.  With the diverticulitis, I learned that most people over the age of 50 have diverticula (pockets) in their colon, but for some reason a few people go on to have those pockets become infected (diverticulitis).  Most of those people never have the diverticulitis come back, but a few people keep having the problem and no one really seems to know why that is. 

So, while I don’t have any real answers to the how or why we suddenly had these serious health problems appear, the result of looking for those answers did lead me to believe that it is possible that our food and environment may well be a major contributing factor to our illnesses … and many of the health problems that are mushrooming throughout our entire population.


For starters, I’ve been working on “clean” eating.  Organic and Non-GMO.  I’ve always been a gardener, so that was already part of our eating habits.  Sourcing other parts of our diet and getting chemicals out of our food – that’s the harder part but I’ve noticed it gets easier every day and that’s great!  It means more people are waking up to the sad fact that our world is poisonous. 

Oh, I haven’t stopped making cupcakes.  Nope.  That’s just not gonna happen!  J   Even though we’re trying to eat clean now, that doesn’t mean giving up goodies.  It just means I’m making my cupcakes and all the other assorted goodies with “better” ingredients now.  Organic and Non-GMO whenever possible, because .. you know .. well, cupcakes, cookies, cakes, pies, and the like are TREATS, not food required for physical sustenance.  Just mental sustenance. 

I’d like to add a few ideas about making the change to clean eating to my blog now because I’ve become a real believer and, if nothing else, I hope to help spread the word and encourage others to start making changes that might just help prevent future health problems.

Leave me a comment to let me know if you’ve been thinking about eating clean, wondering about it, or have already made changes!    

Monday, March 2, 2015

Surprise! It Looks Like a Garfield Cake


It makes me sad that I’m not taking the time to bake much anymore.  It drives me crazy because I LOVE baking!  Hubster and I started a diet – you know – the annual New Year’s diet and we’ve done reasonably well.  Except we’re not losing weight despite watching the calories and exercising … apparently old age is making that fat really determined.  So anyway, I apologize for the lack of posts here.  But we’re getting into birthday season around here, so I’ll have a few days of baking.  Yay!


Youngest son’s birthday was last week.  He’s my lemon-loving baby, so I stuck with my usual lemon cake and frosting recipe – the one I used for his wedding cupcakes. Duelling Lemon Cupcakes  He’s also the world’s biggest Garfield fan, so when we were out garage “sailing” last summer and came across a cake pan with 4 small Garfield faces for A BUCK (!!!) we grabbed it right up and kept it a secret.


The first victory of the day is that I was able to find the cake pan months later.  I credit that to having started the Great Purge of 2014.  I’ve committed to removing excess STUFF around here this year and am going room by room, clearing out unused things.  Almost through the kitchen now, where I started.  I have a lot of things going on at the shop right now so The Purge is in a holding pattern for a couple more weeks.


The second victory was being able to get the Garfield faces out of the pan.  I was in a hurry and you know that’s when everything goes wrong, so I figured that would be my first problem.  I used Baker’s Joy spray and then floured that just to be sure.  To tell you how long it’s been since I last baked, when I started to spray the pan the spray went everywhere BUT the pan – the nozzle clogged – but my kitchen cupboards got a nice washing.  Timing for that could have been better, but what are you going to do?  LOL  Once the cakes came out of the pan safely, I used the remaining batter and made 10 additional cupcakes.


As I said, I was in a hurry and I regret not having taken a picture of the cakes when they came out of the pan.  I was a bit intimidated because, an artist – I’m NOT.  My stick people are unrecognizable.  There were no instructions or a picture to go by to do the decorating, so I hunted around online for instructions, a picture … anything … and finally found a tiny picture of what the cakes were supposed to look like. Garfield Cake Pan       


I mixed up the orange icing and yellow icing and I keep a tube of pre-made black frosting around then took a deep breath.  Standing there, looking at those cakes, I wondered why I thought this was a good idea.  I had to draw on the memory of making recognizable birthday cakes from dinosaur and Big Bird cake pans (and I even know where the pans are after all these years!).  I started with the eyes.  Two blobs of the white frosting, smoothed onto the raised ovals on the cake.  It looked pretty good and I relaxed enough to continue.


Starting with the orange icing and star tip #                   I went around the side of the first one.  It didn’t take long for the icing to get too soft to hold the star shape, but I decided Garfield is hairy so … just kept sticking the icing in the freezer every few minutes.  When it was time to tackle the face, I really wasn’t sure where to start.  It looked like if I could follow where the yellow part was supposed to go, everything else would fall into place, and it did.  I started piping the black accents with a round tip #8 because I’ve had trouble with #2 and #3 tips. #8 was TOO BIG.  I reduced to #6 on the next cake and it was better, but I wasn’t happy.  The #3 tip finally turned out to be the right one and I didn’t have trouble – maybe because I was using pre-made icing or maybe my hands have gotten stronger since it’s been almost a year since the carpal tunnel surgery.


So here are the results and I’m pretty pleased with the final version, considering I'm still a learner.  It actually is recognizable as representing Garfield and it only took 4 tries!


What I learned

  • ·         Remember that cream cheese frosting is too soft to work with using decorating tips.

  • ·         I really can use the #3 tip successfully

  • ·         Put the individual cakes on upside down saucers to lift them from a flat surface to make it easier to decorate the sides.  The saucers are easy to turn.  A large, round spatula easily slides under the cake to move it to your preferred serving plate.


When all was said and done, Youngest Son was surprised and thrilled.  Then he couldn’t bear to eat one and mess it up.  <head desk>  I had to promise to make a fake cake so he can hang one on the wall.  I’m sure I’ll be able to do that in my spare time.  LOL

Tuesday, September 30, 2014

Orange Cupcakes - The Grand Finale


This recipe is adapted from the Food Network Magazine May 2014.


FROSTING:


3/4 C Fresh Orange Juice (it takes about 2 oranges)

1   8 oz. Pkg Cream Cheese, softened to room temp

10 Tbls Butter, softened and  cut into pieces

1 C Powdered Sugar  (more, if necessary)

1/2 tsp Vanilla Extract (again, I used the clear so as to not effect the color)

2 tsp Finely Grated Orange Zest

Orange Food Coloring Gel (or  3 drops yellow and 1 drop red liquid food coloring)

The juice of 2 oranges came out to be just a little more than 3/4 C of juice

I found that juicing 2 oranges gave me just slightly over 3/4 C of juice.  Measure the juice, put it in a saucepan and bring it to a boil, then reduce it to medium and simmer until it is reduced down to 1 1/2 Tbls.  This took me about 20 minutes, but I was taking it slow because I didn't want to mess it up.  I do not recommend taste testing this - I did and WOW!  It is TART!  Set the syrup aside to cool.
 
Reduce the orange juice to a syrup - about 1 1/4 Tbls
 
Beat the cream cheese in a large bowl on medium high until it's fluffy.  Add the pieces of butter, one at a time until the mixture is smooth.  Reduce mixer speed to low and add the powdered sugar (Food Magazine's instructions say to sift the sugar in, but it was taking forever so I sifted a little bit and then just added the rest a little at a time).  I added an extra 1/2 cup of the powdered sugar because I felt that the frosting wasn't going to hold a piped shape.  Add the vanilla and the orange syrup, and finally the food coloring and beat it until it is well combined. I also added about 1/4 tsp of orange flavoring because when I tasted the frosting, it didn't taste distinctly orange.

Assemble the frosting ingredients - the reduced orange juice on the right
Refrigerate the frosting about 15 minutes to firm it up, then frost and decorate your cupcakes by your preferred method.  (The original recipe suggested topping with a piece of candied orange peel.)  I piped it on and then topped them with some colorful autumn leaf sprinkles.

Aaaand .... TA DA!!

Orange Cupcakes decorated for fall
Everyone LOVED the cupcakes and said it reminded them of orange dreamscicles.  It was generally agreed, though, that the frosting gave it the dreamy flavor.  Personally, I wasn't happy with the texture of the cake.  For me it was dense and dry.  No one mentioned it (probably just being nice!) but Hubby agreed with me.

The next time I make these, I will use my lemon cupcake recipe and substitute oranges for the lemons.  Even if the frosting gives the majority of the flavor, at least the cupcakes will be soft and fluffy.


Tuesday, September 23, 2014

Orange Dreamsicle Cupcakes


Wow.  I had really big plans for summer.  One of my favorite things to make is cupcakes for our family 4th of July party … and I never got to do that!  Why, you ask?  Because I got to take 2 trips to the hospital and pretty much MISSED SUMMER!  Summer is my absolute favorite time and I missed it!!  SIGH.  But the good news is that I'm pretty much put back together and with the cool fall weather I'm having baking attacks.

My darling hubby has been wishing for orange cupcakes.  I planned on making them for the 4th of July but … see above.  Hubby can't eat anything with citrus juice in it because the acid blisters his mouth.  It broke my heart a few months ago when he bought some orange Tic Tacs because he said he just misses the orange flavor.  We've found that when the acid is tamed with dairy ingredients and/or cooked, he can safely eat citrus.

Originally, I was going to take my tried and true lemon cupcake recipe and just switch out the lemon for orange.  But I really wanted to be sure of the recipe because - you know, how sad would it be if I made these cupcakes for him and they turned out to be a flop?   My concern with adapting my lemon cupcake recipe is that I don't know if the flavor from oranges is as strong as from lemons.

During my vacay at the hospital this summer, I saw a recipe for orange cupcakes in the Food Network Magazine and decided to try that, so my recipe is adapted from the May 2014 issue "Orange Cream Cupcakes".
Liine cupcake tins with paper cups
Line cupcake tins with paper cups
 
To start, preheat your oven to 350 degrees and line your cupcake/ muffin pan with 12 liners.  Then  assemble your ingredients and whisk the flour, baking powder, and salt in a medium bowl.  (I always line more than called for because it's easier to have the liners ready if I happen to have more batter.)

Assemble all ingredients
Assemble your ingredients

Don't you love my fancy-schmancy pressed glass bowl holding my eggs?  Lately, I've started using a lot of my grandmothers' glassware, and the Pyrex and Fire King pieces I've collected over the years.  We've had the Pyrex Friendship Cinderella bowls for ages, but I've never used them because I thought they looked a bit cumbersome with those handles … WRONG.  I might be the last person on earth to "get it" but those aren't handles!  They're for POURING!  (Yes, I feel dumb.)  

I discovered an easy, low-stress way to melt butter.  I put my butter into one of my Pyrex bowls (that's what's in the cute little bowl with the birds on it) and microwaved it on DEFROST.  The defrost setting on my microwave asks for the weight and I just set it for .5 lbs and it slowly melted the butter without lots of spattering.  Of course, all microwaves heat differently so you need to watch the butter in your own oven so it doesn't burn or spatter.

Beat the eggs and sugar in a large bowl (aka my Kitchen Aid bowl) with a mixer at a medium high speed until it's light and fluffy then reduce the speed and S-L-O-W-L-Y beat in the melted butter - you don't want to end up with scrambled eggs!  My mixer has a shield to help keep me from making an excessive mess and the pouring handle on the Pyrex bowl works perfectly with it!

SLOWLY pour melted butter into egg and sugar mixture

Then add the orange zest and vanilla.  While I'm not a fan of "fake" ingredients, I used clear vanilla because I didn't want to darken the color of the cake with real vanilla.  As it turned out, the cake was the color of a yellow cake.  I also found that the zest of one orange came out to be about 1 tsp.  *I was careful to use organic oranges because I believe they are sprayed with chemicals and I doubt all the washing in the world would get it all off.

I found that the zest of one orange was about 1 tsp

Finally, beat in the flour mixture in 2 additions - pour about half in then add the milk - then pour the rest of the flour in.  Beat this until it is just combined - don't over mix.


Fill cupcake liners about 2/3 full

Fill the cupcake cups about 2/3 full and bake at 350 degrees until a toothpick inserted into the center  comes out clean - about 18 minutes.  Let the cupcakes cool for 5 minutes and then remove them to your wire rack to finish cooling.  (As it turned out, the recipe made exactly 12 cupcakes.)

Bake about 18 minutes at 350 degrees, cool in pan for 5 minutes, then finish cooling on wire rack
 
Next …. The orange frosting and the grand finale!

Here's the recipe - adapted from Food Network Magazine May 2014

CUPCAKES:

1 1/2 C Flour
1 1/2 tsp baking powder
1/4 tsp salt
2 large eggs at room temperature
2/3 C sugar
12 Tbls butter, melted
2 tsp finely grated orange zest (I prefer organic)
1 tsp vanilla extract
1/2 C milk


Sunday, June 1, 2014

Chocolate Cake and White Cake EQUALS a Friend's Birthday Cake


Wow!  I can't believe it's been almost a year since my last post.  Honestly, I don't know where my time goes.  But with summer upon us, I'm hoping to catch up and get back to some serious baking.

I volunteered to bake a cake for a dear friend's birthday.  And she doesn't know it.   The last cake I decorated was WAY back in the beginning and it was pretty … wobbly.  Ok - it was bad.  So, I'm feeling a bit intimidated.

First, everyone agrees she likes chocolate.  So I planned a chocolate cake.  Then, luckily, we were all talking about desserts and she mentioned that she doesn't like chocolate cake unless it's really moist.  Hm.  Great.  Sounds like "everyone" likes chocolate instead of Judy!  LOL

So me thinks, thinks me … I'll use my go-to chocolate cupcake recipe because it is super moist.  Then paranoia took over.  I need to do half chocolate and half white.  No idea how to do THAT.  Look it up on Cake Central.  Ok, I think I can swing that.  I did the tilt and pour method.  I poured the chocolate into the tilted pan first, because it is the heaviest batter.  When I added the white cake batter, it was amazing.  They pretty much stayed 2 separate cakes!  Good on one hand, maybe not so good on the other because the cake wanted to crack into 2 pieces where the 2 flavors met.  The frosting helped keep it all together.

I tried a different frosting because I wasn't happy with the consistency of my usual buttercream.  Again, I struggled getting the right texture to pipe but I finally got it and once I did, it worked great.  Unfortunately, I was running out of time and my flowers and writing were pretty shaky. 

I'm so mad at myself because I was so flustered that I forgot to take pictures.  But at least here is the final result.


Now, as to the "age" … we thought it would be nice to not be real obvious so another friend had her hubby get this equation for us.  We wanted it really complicated.  If anyone would like to verify what that age is, please let us all know.  We know what it's SUPPOSED to be, but … well, it's been a few years since math class.  LOL


Monday, June 3, 2013

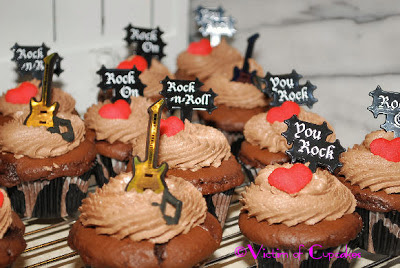
Bon Jovi Cupcakes


Yup.  That's right.  BonJovi cupcakes.  HubbyDear's co-workers requested chocolate cupcakes decorated with a BonJovi theme for one of them.  Seriously.  My mind went                                   .  Just like that.

I've known about this for a few months, so I've had time to obsess … to no avail.  Sadly, I resorted to rather "boring" decorations.  I really like to make my own decorations, but this one just didn't happen for me.  We raided Country Kitchen for basic Rock & Roll themed decorations.

To make up for it, I'm making Nutella cupcakes instead of plain chocolate cupcakes.  I've been anxious to do a filled cupcake since my class.  I have the filling tip!  I want to use it!  :)


Favorite Chocolate Cupcakes
LATER …

TWO containers of Nutella later … mmmm! 

I used Jamie's Nutella cupcake directions that included my go-to chocolate cake for the cupcake and Nutella Buttercream.  OH. MY.  <insert multitudes of heavenly angels singing>


Using a cupcake filling tip
Epic Fail Using the Filling Tip
As for the filling tip, I don't know if I'm just a wimp and couldn't squeeze the Nutella through it, but I could NOT fill those cupcakes!  I ended up using a regular frosting tip #8 instead and treated it the same as if I were using the filling tip - pushing it into the cupcake center and filling until the top swelled a bit.  It was kind
of amazing that I jar of Nutella was EXACTLY the right amount for 24 cupcakes!


Nutella Filled Cupcakes
Now, as for the Nutella buttercream frosting … let me repeat:  OH.  MY.  <there go the angels again!>

And the Nutella cupcakes have been proclaimed by hubby's office as the best cupcakes yet!  

Rock & Roll Cupcakes
Rock and Roll is here to stay ... these cupcakes won't last long!

Saturday, March 9, 2013

Chili Cheese Corn Muffins & Ham and Beans OH MY!


Believe it or not, I've never made "ham and beans".  Frankly, until recently I wouldn't eat any beans other than Van Camps or green beans.  I love chili, but HATE kidney beans.  There's always a little pile of beans left in my bowl. 

A dinner we had on vacation last summer opened my eyes to pinto  beans and I've been experimenting  with different beans ever since.  What I discovered is that some beans aren't so icky.  The little ones that don't have a tough "skin".  I still can't accept kidney or lima beans into my life.  Baby steps ...

After making chili this winter using pinto beans instead of kidney beans and actually eating the beans (it was actually hard to not automatically pick the beans out!) I decided it was time to go out on a limb and make/try  ham and beans - one of the two meals at home when I was a kid that I would literally try to hide from .  (The other is … liver and onions.  AWwwKK!  I don't care how old and mature I get, I will NOT eat them anywhere!  Take THAT Sam I Am!)

I had to look up a recipe for Ham & Beans.  They all looked pretty much alike, but almost all called for using one lb. of navy beans, soaked overnight.  I cheated and used beans in a jar.  DH says that is what he remembers his mom using and we had frozen some leftover ham chunks.  Little else is required!

Ham Chunks
1 -  48 oz jar Randall's Great Northern Beans
1/2 tsp  Onion Powder
1/2 tsp  Salt
1/2 tsp  Black Pepper
1/4 tsp  Cayenne
1/2 C     Brown Sugar
1 Tbls    Dry Parsley

Just  throw it all in a nice, heavy pot and simmer it all on the stove for anywhere from a half hour to an hour and that's it!  I had to add about 3/4 C water because it got too think and pasty, and of course, the seasoning can be adjusted - but this is just my starting point. 

What goes with Ham'n'Beans??  Cornbread!  Cornbread muffins are akin to cupcakes!  My hubby loves these corn muffins and they're especially good with Mexican style food.  We really liked them with the ham 'n' beans, too.
 
1 box Jiffy Cornbread Mix
1 box Jiffy Golden Yellow Cake Mix
2 Eggs
1/2 C Milk
1/3 C Water
2 Tbls Vegetable  Oil - I use Canola
1-4 oz Can of Chopped Green Chilis, drained
1 C shredded Cheddar Cheese

Mix the DRY cornbread mix and the DRY cake mix in a bowl.  I use my tried and true Tupperware Mix and Pour (I think that's what it's called) because I like being able to  … get this … mix and pour the batter into the cupcake cups!  Theoretically, you're supposed to mix the eggs, milk, water, and vegetable oil in another bowl.  I'm lazy and don't like having an extra bowl to wash, so I do it all in one.  Mix the ingredients together just enough to make sure all the ingredients are mixed and stop.  Add the green chilis and the cheddar cheese and mix just enough to make sure everything is fairly evenly distributed.

Fill your muffin cups (greased) or cupcake liners 2/3 full and bake at 350 degrees for 20 - 22 minutes or until a toothpick in the middle comes out clean.

You can sprinkle the tops with more shredded cheese immediately after removing them from the oven and it will melt on top.  Never too much cheese!!  I got carried away trying to remember to take pictures that I forgot to top them with more cheese shreds.  Oops!  We managed to eat them anyway. 

This makes about 16 muffins.

Adapted from Taste of Home's Quick Cooking 2000