Pages

Monday, December 31, 2012

Autumn Wedding Cupcakes


Wow … Christmas sure got in the way of my cupcake making!  And writing.  And a lot of other things, too.

The cupcakes for wedding #2 came out really well.  The candies were a hit, too.

We finally settled upon Carrot Cake cupcakes, Snickers cupcakes, and white wedding cake cupcakes.  Although we were using previously tried flavors, the decoration needed personalizing.  The wedding colors were the colors of fall leaves, with orange being the dominant. 

I made the white cupcakes with the same recipe as I used for the sunflower cupcakes earlier.  Our bride-to-be really hadn't requested anything particular as decoration and I really wanted them to be pretty and special for her.  Up until now, I really hadn't done much with flowers.  All I could come up with was a deep yellow rose, leaves … it was just very abstract in my mind.  Not having made roses since my class a year earlier, I wasn't entirely sure I could do it, but … I did!

Unfortunately, I didn't have the brains to take photos of the process.  It really was kind of a struggle, though.  The edges of my rose petals were incredibly jagged.  I know a little bit makes it look more "natural" but this was AWFUL.  It was hot in the kitchen so I thought the frosting consistency was wrong.  I tried making it really soft.  Didn't work.  Tried really tight.  Didn't work.  FINALLY thought to go get a new rose tip.  Mine was a tiny bit bent.  Amazingly, that was the problem! 

 So … I made a bunch of yellow roses.

And then … I put them onto the newly frosted cupcakes and added tan leaves, burgundy flowers and green vining leaves.  Um .. I may have gone a little crazy.  But they sure were pretty!


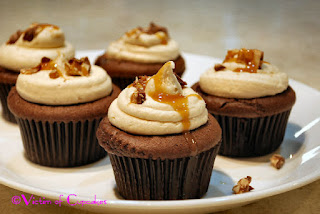
I was disappointed in my Snickers cupcakes.  They tasted perfect, but I topped them with chocolate trees trimmed with fall colored leaf sprinkles.    I couldn't think of any way to frost the cupcakes with seriously gooey caramel, so I simply pushed the tree into the top of the cupcake and sprinkled a few leaves on top.  Also … I didn't take the height into consideration.  When we started putting them in my smaller cupcake stands, they were too tall and we ended up having to almost place them flat on top.  Thank goodness the cupcake was universally loved!


Here are the steps for the trees:

Wednesday, November 7, 2012

Autumn Leaf Candies


Well!  I had to take a little cupcake hiatus.  Gained too much weight the last go 'round despite the fact that I never even licked the bowls or spoons.  AND I only ate one of each cupcake just to make sure they were as good as I wanted them to be. 

That, and my online vintage clothing and jewelry shop was suffering a bit from lack of attention.  I'm not good at multi-tasking.  Now my housekeeping is suffering from lack of attention.  Seriously, I need a maid.  There are so many more interesting things to do than dusting!

So ... the next bride-to-be elected not to fight the reception hall and their policy of not allowing homemade cake.  Instead I'm doing the cupcakes for the rehearsal dinner.  The flavors are decided - chocolate Snickers, carrot, and white wedding cake. 

Our Bethie-Pie loves fall colors and her wedding colors are autumn leaves.  A happy coincidence - her mother-in-law to be (that would be ME) loves those colors, too.  You'd think this would make it easy for me to decorate these cupcakes, but the problem is that I'm only making 3 flavors, not 5 and only 50 cupcakes and not 125.  I have too many wannado-s. 

I want do trees with leaf sprinkles.  I wanna do viney leaves.  I wanna do beautiful magenta, orange,  and golden yellow roses.  I wanna do multicolored fondant leaves.   I wanna do … well, I guess an Angry Bird.  I know, I know … doesn't quite go with the theme but my son is a rabid St. Louis Cardinal baseball fan.  His younger brother got dinosaurs on one set of his wedding cupcakes.  I need to do something for him.

I'm going to make flavored candies in favor cups in leaf shapes.  And I'm dreaming of making flavored sugar leaves -- for what reason, I have no idea.  I seem to have this need to overdo it. 

Awww … I've turned into Martha Stewart. 

I'm starting with the candies because they have a much longer "shelf life"  and frankly, this time around I do have a clue about what I'm doing.  I've been making filled chocolate candy at Christmas since the boys were quite little, so this SHOULD be a no-brainer.  (Famous last words.)  I never took a class on the "proper" way to make candy so if you are a stickler for "proper", run away NOW.

I use an old electric food warming tray that I got as a wedding gift, um, awhile ago.  It seems to keep the candy at a nice, even temperature.  I tried melting the chocolate in the microwave and it works sometimes, other times I get busy and burn it .  Unpleasant.

These candies will be orange, yellow,  green, and brown and will be flavored cinnamon, maple, and English toffee.  Chocolate will take care of itself!  I'm using oils because I've always added mint oil to my Christmas chocolates and it works very well. 

It's fairly easy and other than the candy mold, you can probably use kitchen items you already have.  For instance - if you can't find a warmer (try ebay - they can be found for about $10) you can always melt in a double boiler.  If you don't have the paint brushes, just spoon it into the mold.  Some people use plastic bottles that look a lot like condiment bottles.

You need

Electric warming tray
Small heat proof dishes - one for each color and/or flavor
Candy confectionary coating disks - color(s) of your choice
Chocolate disks - I use "Cocoa Lite"*
Oils - flavors of your choice
Something to stir the melted candy with
Paint brushes, food grade, one for each color and/or flavor
Candy molds

*I have used milk chocolate disks in the past and this slow melting worked well enough, but milk chocolate is very fussy about temperature.


Put a small handful of each color candy disk into a separate little heat proof dishes.  Personally, I LOVE my vintage Pyrex custard cups, also a wedding gift.   Plug in your tray and set the dishes on it.  The disks will slowly melt -  I think this took about 20-30 minutes to get the first ones to start melting.


Keep an eye on them.  The bottom ones will start to look a bit shiny and may completely melt.  I try to not have them completely melt because when you stir them, they will actually be melted more than you think.  Stir them fairly well - there will probably still be lumps, which is fine.  Now add another small handful of the candy coating pieces on top.  Wait another 15 minutes or so and stir them around again.  They will still probably be lumpy.  Depending on the size of the dish you are using to melt in you may wish to add a few more pieces of candy and let that melt in.  Stir frequently now.   When using flavoring, I try to have as much candy melted as the dish will hold and still be easy/not messy to stir so that I get as many as possible candies that have the exact same flavoring.  Obviously, your next batch will be slightly different no matter how much you try.  Make sure to keep your stirrers separate so the colors don't mix AND especially once you've added the flavoring, you REALLY don't want to mix flavors!


Just so you don't panic and think something is going wrong, my chocolate didn't melt much after 45 minutes and I started melting the pieces all at the same time.  The chocolate will have a completely different texture as it melts, too.  Once it begins melting to the point that all the pieces are mooshy, give it a good stir.  It is usually pretty thick, but the more you stir, the more it will soften and smooth.  Add more chocolate disks and melt in, as above.

Flavoring can be a bit tricky, particularly if you're making more than one flavor.   You might want to have a taste helper around because after a couple of tastes YOUR taster won't work as well.  As with wine tasting, try to "cleanse your palate" between tastes - even of the same flavor. I start with one drop of oil, stir it in well, then taste.  Add one drop at a time - these oils are POTENT.  If you get some on your skin, it's a good idea to wash it off.  It's never harmed me, but then I'm also rarely sensitive to things.  (Note:  I got a little cinnamon oil on my lip and it did "burn", but washed off quickly with soap and water.)

 Just to give you an idea of how much to use, I used 5 drops each of these oils and felt that the flavor wasn't intense, but could definitely be recognized as maple (green), cinnamon (orange), and English toffee (yellow).

Left - small mold /// Right - large mold
Small mold, filled
As you can see,  I've chosen 2 different candy molds.  One is quite a bit larger and I'm going to start with this one since it is easier to show.  Using a paintbrush, pick up a blob of the melted candy and place it in the center of the mold.  Then, use the paintbrush to gently push it out toward the edges and up the sides.  Try not to get the candy outside of the mold.  It will take 3 or 4 "scoops" painted this way to fill an individual mold, depending on the size of the mold.  When the individual mold is full, "paint" the back smooth.  Mine usually ends up with a little loop - I tried making it flat and it didn't work for me.  So now I just go with it and enjoy my little curly cues.  After all the individual molds are filled, put your mold in the freezer for about 5 minutes or more if you're not in a big hurry.  Here is where it's handy to have a couple of molds - fill the next mold and trade them in the fridge.

Filling (painting) the large mold with candy coating.
Unmolded large candies


After taking the candy in the mold out of the freezer,  simply turn the mold over and the candy will fall out.  If not, just give it a shake.  If you have a few that look a little sloppy at the edge - while the candy is still cold/frozen you can use a knife to scrape away the overflow and clean up edges.
Small candies (wheat sheaves & turkeys).  The two wheat sheaves on the far left have been "trimmed" .


Thursday, August 23, 2012

Victim of Zucchini


I took a longer break from cupcakes than anticipated.  I was still going strong the weekend after July 4th, but then remembered that if I didn't get back to working at my vintage clothing business, there wouldn't be any excess cash to feed this cupcake affliction.

Enjoying zucchini muffin with fresh Amish butter and a good cuppa!
My boys have loved my zucchini bread since they were very little.  I don't remember where I got the recipe, unless it was from my Grandma Lucy.  The first year after Hubster made me my new raised bed garden, my zucchini was prolific and I made probably 6 or 8 batches of zucchini bread.  After the first couple of loaves, we realized that the waistline was becoming the wasteline.   I found 3 little loaf pans stashed away in my cupboard and started making mini breads, but quite time consuming with only 3 little pans, so I graduated to muffin/cupcake pans.  A perfect snack for one!  I froze the muffins, I gave the boys muffins to take with them wherever they went, and finally ended up freezing them.  I even froze the shredded zucchini so I could make it later, but it was so long before anyone could stand more that it got freezer burned. 

The past 3 summers, I've tried to grow various squash including zucchini.  We were actually missing the bread again.  :)  I only got a few "proper" sized zucchini at the beginning of the year and used/froze those.  By the time I was ready to let them grow to a larger size, they were attacked by squash bugs.  This year, I hadn't planned on even attempting any squash until I learned the secret to getting rid of them (other than soap that didn't work for me or chemicals that I really don't want to use and didn't work either).    

I'm PROUD of my zucchini plant!  The radish flowers are actually kind of pretty.
 To try it out, I planted 2 hills of zucchini seeds - no use planting a bunch and feeding the entire county's squash bug population.  Then I added the secret:  Radishes.  I planted radish seeds around each hill and then scattered some randomly.  They have to be left to go to seed.  I think it's safe to say that it's a success, now that I've got 2 HUGE plants that have produced the nicest zucchini I've ever grown.  Now they're doing the turning-from-a-little-bitty-zuke-one-day-to-a-caveman-club-the-next thing that they're so famous for, so it's time to crank up the oven, get out the pans, and shred that zucchini!  I'll notify the grocers that I'll be needing every available egg again!

Power tools make life worth living


After I cut out the seeds, I thought of my small ice cream scoop.  Easy peasy!


SERIOUSLY YUMMY ZUCCHINI BREAD
3

Eggs
2
C
Sugar
1
C
Vegetable Oil
2
C
Zucchini, grated
3
tsp
Vanilla
1
tsp
Salt
1
tsp
Baking Soda
1/4
tsp
Baking Powder
3
tsp
Cinnamon
1
C
Walnuts, coarsely chopped (optional)

Beat the eggs until light and foamy.  Add the sugar, oil, zucchini, and vanilla and mix lightly but well.  Combine the flour, salt, baking soda ,baking powder, and cinnamon .  Add to the egg  and zucchini mixture.  Stir until well blended.  Add nuts,  if desired, and pour into greased pans.  (I tried using the candied walnuts used in salads.  They added a nice little crunch.)  Bake in preheated 350o oven.  Bread is done when toothpick inserted into center comes out clean.  Remove from oven and cool in pan 5 minutes, then turn out and finish cooling on wire racks.

9 x 5 x 3 loaf pans, bake for 1 hour (there should be enough batter for 2 loaf pans of this size)
Muffin tins, bake for 20 minutes        (approximately 20 muffins)
Mini loaf pans, bake for 27 - 30 minutes   

Hungry?
These freeze really well.


Monday, July 9, 2012

Hooray for the Red, White, & Blue Cupcakes!


Woot!  I had a good excuse to make more cupcakes!  We're had some family over for an Independence Day party and of course, I MUST bake cupcakes!

The Problem:  I was entranced by red, white, & blue star shaped sprinkles when I was at Country Kitchen shopping for the wedding cupcake supplies.  They forced me to put them in my basket.  And so did the matching cupcake liners. 

Don't you hate when inanimate objects mess with you?  Bait you?  Call out to you???  (oh my)

Anyway, ever since these two objects jumped into my shopping basket, I've been dreaming of swirls of fluffy, white frosting with red, white, & blue stars scattered strategically on top.  But what kind of cupcake?  Vanilla?  Mayybee …  Confetti?   Naw, too much going on with all those sprinkles.   Chocolate?  Hmmm …

On the other hand, for a 4th of July picnic-party-hoopla, berries are practically a requirement AND as a plus, berries do cooperate with the theme by being red and blue.   I could make the berry cupcakes again.  But the frosting is pink and talk about CLASH!  I suppose I could make the frosting become red, but then the star sprinkles wouldn't look good. 

The Solution:

Make the Carrot Cupcakes with the white cream cheese frosting in the patriotic cupcake liners with the star sprinkles … AND … something summery … like root beer float cupcakes!

Who says I don't have a cupcake problem???

Sadly, I was really disappointed in the root beer float cupcakes.  They were ok, but considering that the last cupcakes I made were proclaimed pretty much worldwide as being PERFECT (aka HEAVENLY) they probably didn't stand much of a chance. 

I used the recipe from the Better Homes & Gardens magazine, "Cupcakes 150 Sweet Recipes".  It needs some serious tweaking.  The cake did have a root beer flavor, but the texture was dense and dry.  The frosting was supposed to have a vanilla ice cream flavor - it did not.  But they were edible and cute and everyone liked them. 

So now I have two challenges:  First, I used my last box of Carrot Cake mix so I've got to come up with a knock out carrot cake recipe.  Second, I love the idea of the root beer float cupcakes so I'm going to FIX IT!  

Monday, July 2, 2012

From Victim to Addict?


NOW I've gone and done it!  I've crossed from recreational cupcakes to the hard stuff and I'm not sure I'll be able to control this.  I'm not sure I even want to!

The "hard stuff" is Snickers Cupcakes.  This recipe rates a full scale O M G.

THE Snickers Cupcake
Just looking at the picture makes me want a cupcake NOW!
The recipe can be found at My Baking Addiction  http://www.mybakingaddiction.com/snickers-cupcakes/     It's one of the recipes I'd marked to try out .  If I ever thought I could stop making cupcakes, this just put an end to that thought.   I should just start applying to be on The Biggest Loser now, because just one cupcake must be 4000 calories.  And I DON'T CARE!

I was a bit concerned about the measurements in the recipe since my trusty Duncan Hines Devil's Food Cake mix is now short 2 ounces AND I didn't have the large package of chocolate pudding mix.  I kept to the recipe except for using less cake mix and pudding and they came out unbelievably amazingly totally yummy GREAT! 

This recipe was originally posted in 2010  and is still getting comments on the My Baking Addiction blog and I noticed one from just a couple of days ago asking what to do if the only cake mix you can find already has pudding in it.  She responded to just use the smaller 3.9 oz box of pudding.  I'm anxious to try this recipe again with a) a large box of chocolate pudding and b) with the smaller box of pudding in the cake mix with the pudding already in it.  I'm curious what the difference might be.  Probably not much - I swoon too much when eating these to take note of anything but a huge difference!  LOL

If you like Snickers at all, you MUST make these cupcakes.  They're very easy.  Just watch out that you don't taste test the frosting too much (spoken as someone who did).  It is VERY sweet and it is VERY delicious and VERY addicting.  Also, I had exactly the amount needed to pipe the frosting on top.

Snickers Cupcakes
You know ... the baker gets to eat the messy looking ones!

Monday, June 25, 2012

NOW What Am I Supposed To Do??


A week, then two went by and I kept having this feeling I should be doing something … baking something … you know … cupcakes.  But I don't HAVE to now!  I tried not to, but finally I couldn't stop myself.  I made more cupcakes.  I'm really enjoying it.  Nothing like having an incredibly high calorie, totally bad for you hobby! 

There a a LOT of cupcake recipes bookmarked and pages marked that still need to be baked!  They've all been put aside until after the wedding … which is now … so ...

Where to start?  Well it just so happens that I had some fresh strawberries that I needed to use up.   It's summer and it's time to enjoy fresh produce!

I picked up a Better Homes & Gardens Special Interest Publication about cupcakes a few months ago and many of the recipes are from cupcake bloggers.   The recipe I chose was apparently adapted from Cupcakes Take The Cake  - the Vanilla Very Berry Cupcakes.  Now that I've made the recipe, I wish I'd thought to use the recipe directly from the website because it's written just enough differently that I might not have goofed it up … except that apparently my goof turned out good.  LOL

When I realized my screw up,  I just started improvising.  I mean, I was almost done with the cupcake recipe and didn't want to throw it out.  Basically, what I did was after setting aside the berries for garnish, I went straight to "thoroughly mash" without stopping at "lightly mash".  Don't really know why … maybe I was just feeling a bit aggressive, but I did a pretty good smoosh job on the berries. 

The recipe said to place a tablespoon of the batter in the bottom of each of the cupcake liners, which I did.  (I used the (Pink) Reynolds StayBrite™ Baking Cups left from my earlier experiment.)  And then, 1 teaspoon of the berries on top of that, followed by enough batter to properly fill the cup.  Then I baked them.  They came out of the oven looking absolutely beautiful! 

It is at this point that the recipe says to "thoroughly mash" the berries, add sugar, and cook them to thicken then use as filling for the cupcakes.  Since I had already put a spoonful of mangled berries in the cupcakes, I was afraid more squishy berry filling might just end up a mess.  So, I decided to get extreme and put them through a fine strainer to remove most of the seeds and blueberry skins and then mixed that into the frosting.  Both the original recipe in the blog and the recipe in the BH&G publication said to frost with buttercream frosting.   I wasn't thrilled with the BH&G "Classic Buttercream" recipe because it requires eggs and cooking.  So, I chose their "Butter Frosting" recipe, added the smooshed and strained berries and added more powdered sugar to make it piping consistency.  (As it turned out, I should have added a little more.)  They came out so pretty with the berries added to the top, but I thought it needed something and ran out to the garden and snipped some lemon balm leaves to add.


Hubby loved the cupcakes, but for some reason I thought they were dry.  I think that is simply because I was so used to the extremely moist, dense cupcakes I've been making for the wedding.  Hubby took all but 6 of the cupcakes to work with him and the report was …. Wait for it …

They liked these better than all the others!   LOL  I hope all my goofed up recipes come out this well!

Butter Berry Frosting

3/4    Cup butter, softened
2        lb. Powdered Sugar
1/3    Cup Milk
2        tsp Vanilla
1/4   Cup "Thoroughly Mashed" and strained berries - (I used strawberries, red raspberries, and blueberries)

Beat the softened butter with an electric mixer at medium speed until  light and fluffy.   Beat in 2 cups of the powdered sugar, then the milk and vanilla.   Gradually add the remaining powdered sugar.  Slowly beat in the berry mixture until frosting is  the right consistency to pipe (or spread).  If more liquid is needed add a bit of milk or more of the berry mixture.

For the record, these cupcake wrappers did not peel!  The cupcake recipe has buttermilk but no egg whites.  I'm starting to think the culprit for the peeling problem is recipes with only egg whites.

Friday, June 22, 2012

The Sunflower Wedding Cake


Our bride and groom wanted to have a somewhat traditional small top tier wedding cake to freeze for their first anniversary.  I struggled with the decoration - it couldn't be all fluffy and roses and pearls … all traditional wedding cake-y.  It just wouldn't have fit with the feel of the cupcakes.
I knew I needed to have sunflowers as the floral part of the cake, but at the time I was starting to plan the cake decoration I still wasn't happy with the sunflower decorations on the cupcakes.  It's great to live close enough to go to Country Kitchen (or maybe it's not!) because just browsing all the wonderful cake and candy supplies helps me come up with ideas. 

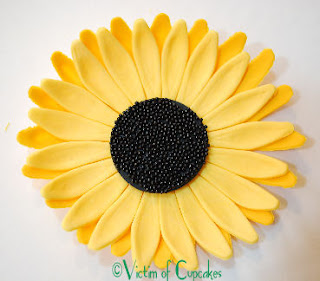
One of the reasons I wasn't happy with the cupcake sunflowers was that the centers just didn't look right.  I didn't want to use Oreos  because they were really too big and they just aren't, well … pretty.  Wandering down one aisle at CK, I found different sizes of sunflower/daisy fondant cutters and daisy center stamps.  I thought I had the answer to my problem and also I thought  the multiple sizes of the  sunflower cutters  would be helpful in decorating the cake.  Since I already had the black fondant for the lizards, all I needed was plain fondant that I could color for the sunflowers.

Work in Progress
Once I got home with my new acquisitions, I started hunting around the internet for instructions for making gumpaste sunflowers.  You Tube has several really good videos.  After a bit of trial and error I learned that using the proper equipment really does make a difference.  I tried rolling the fondant with my trusty marble rolling pin and I just couldn't get it thin enough.  When I finally broke down and got a fondant rolling pin and mat, it was a breeze.  I also had to get the veining tools.  It makes a huge difference!


Large Fondant Sunflower
Small Gumpaste Sunflower
It turned out that the daisy center stamps weren't large enough for the biggest size of the sunflower.  I ended up using a round cutter on black fondant to get the right size.  Then the light bulb came on.  I had some teeny round black sprinkles so I made a sugar glue and painted one side of the round then pressed it into a bowl of the sprinkles.  Ta da!  I was finally happy with my sunflower center!  On the cupcakes, I didn't want to use fondant so I just piped some black frosting the right size of the center then dipped the black into the sprinkles then added the yellow petals. 

I made a bunch of each size sunflower.  I used two large sunflowers "glued" together to make the large flowers for the top of the cake and put one of each size of the smaller sunflowers together for the smaller flowers.  The daisy center stamps worked fine for these.

And then … I realized the sunflowers needed leaves.  By that time, I had no more time to run to Ft. Wayne to get  any kind of leaf cutter or embosser and poking around in my box of cookie cutters didn't produce a leaf cutter.  So I just cut them out and used the veining tools.  Somehow, they came out looking ok.  Not great, but ok.

The cake was the last thing I decorated and I finished it at 4:00 the morning of the wedding.  I was having so much fun that I really never got tired.  My hands were getting sore and you can see the piped decorations on the cake - the bows and swags aren't very good.  Fortunately, the cake was so high on the stand that no one could really inspect it!  LOL

We loaded all the cupcakes into the cardboard boxes with the inserts that night as I completed them.  I left the cake until "morning" (2 1/2 hours later!) to make sure the icing had hardened a bit. 

Cleaned Hatbox
Moving the cake was horrifying but I got it on the bottom of my trusty Tupperware cake taker but when I tried to put the top on I discovered the big sunflowers on top caused the cake to be too tall.  Ho-ly c r a p.  My husband thought of a hatbox.  I'm a mild mannered owner of an online vintage clothing shop, so hatboxes I have but I needed a big one.  I thought of one particular box because it is plastic and came apart AND it was already damaged so I only use it for storage.  After washing it up thoroughly, it served its new purpose perfectly.

Cake in Hatbox
As I was cleaning up my mess a few hours earlier, I put together a little "kit" with white and pink frostings, pastry bag, the decorating tips I had used, and a few extra little sunflowers and leaves.  This was fortunate because I had to re-do the shells on the base of the cake because they all broke off while moving it.  One pink bow got a bit squished so I re-did that, too.

Honestly, I still can't believe how smoothly it all went.  Guess that 6 months of practicing and planning really paid off!

Sunday, June 17, 2012

Ta Da! My Wedding Cupcakes


I'm still having a hard time believing I actually was able to make 130 wonderful cupcakes that my son and his (now) wife would be pleased with.  I'm also starting to go through withdrawal - it feels strange to not have a specific goal to bake for.  While I was searching for recipes and hints and help, I came across a LOT of yummy sounding cupcake recipes and I'm anxious to try them out now so that helps.

Before going any further with patting myself on the back, I can say with certainty that I would never have been able to pull off the wedding cupcakes without  this  blog post on Baa Baa Cupcake, Have You Any Frosting: 

So … without further ado, here are my cupcakes
Sunflower Cupcakes - White Wedding Cake


 I'll post a full photo of the cake in my next post.


Lizard Cupcakes - Confetti Cake


Dinosaur Cupcakes - Lemon


Carrot Cupcakes


And finally -- The cupcakes set up at the wedding


Tuesday, June 12, 2012

Cupcakes for Wedded Bliss


It's over!  My baby boy is married to a wonderful girl and they are off on their honeymoon.  And I didn't embarrass them OR myself - the cupcakes were apparently a hit.  :)

There have been many times in past "projects" that I have maybe "bitten off more than I can chew" and afterward swear I will never do that again.  This is NOT one of those times.  

Despite getting only 6 hours sleep in the 48 hours prior to the wedding and having my feet and legs swell from standing for so long -- it was a TON of work, but I would SO do it again! 

The last couple of weeks were just too busy with wedding preparations, experiments, events, and baking (plus my oldest son had a surprise closing on his first house the Friday before the wedding, so we added some celebrating and moving to  all the other things necessary for the week of the wedding!)  I never really had a chance to write anything or edit any photos, so I'm getting a little caught up here.

  • Lizard Confetti Cupcakes:  I found a lizard candy mold and pressed black pre-made fondant into it, then used a  fine decorating tip (#3, I think) to decorate them.  They turned out really cute!
  • White Chocolate Frosting:  I made another batch of the chocolate cupcakes with the white chocolate icing and increased the amount of white chocolate.  What I found is that I still have to increase the amount of powdered sugar and it really didn't accomplish much.  I also discovered that this frosting does not travel well - particularly if it's hot outside.  And because it never really sets up, it's next to impossible to remove the cupcakes from the cardboard holders without squishing the frosting and sometimes the cupcake, too.
  • FINALLY got the sunflower cupcake decorating perfected!  I'm really pleased!
  • The little black and white sugar decorations I used on the white chocolate cupcakes a) weren't as large as the ones I printed and used when I was experimenting and b) because they were small, the white on white color disappeared into the frosting.
  • A vintage hatbox - the clear plastic kind with a "quilted" lid and base - will work to transport a cake that is larger/taller than a typical Tupperware type cake taker.
  • Purchasing cardboard boxes and cupcake inserts is the ONLY way to move 130 cupcakes from one location to another.
  • Once cream cheese and buttercream frostings are WELL set up, they travel pretty well and are reasonably easy to remove from said boxes.  Squishy frosting that never really sets solidly (aka white chocolate) is a big problem.
  • I learned how to use gum paste to make awesome sunflowers to decorate the 8" cake - all by myself <patting self on back> and they were delightful!
  • Purchasing an 8" styrofoam dummy cake to practice is an EXCELLENT idea.  I was able to play around with colors, sizes, and ideas to see what worked without taking a chance on the real cake.  (I'll post a photo of the real cake soon!)


I'm still cleaning the kitchen.  There was a lovely, very fine layer of powdered sugar in my baking corner and I swear I used just about every piece of baking equipment in my kitchen.  Most of that is already clean, so today's main project is reorganizing and putting things away AND washing the cupcake stands.  The kitchen looks rather barren without all the cupcake equipment that has lived there, fairly permanently, for the last 3 months!

I'll post some photos of the finished cupcakes soon.